This article explains how to organize your spaces into categories and personalize their settings.
Jump to:
1. What are space types and space groups
1. What are "space types" and "space groups"
In YAROOMS, you have the ability to organize your spaces into TYPES (desks, rooms, offices, parking spaces etc.) and GROUPS (Manager desks, IT desks, Private Offices, Free Offices etc.).
You can create as many Space Types as you like, depending on your use case, each with their own set of Space Groups.
🔆 One Space Type can have multiple Space Groups.
Space Groups are useful if you want to:
- set up specific access for users (ex: this group of desks should only be available for the Sales Team)
- enforce different settings for separate group of spaces (check-in methods, booking options, meeting limits etc.)
| Space type | Space group |
| Desks | Individual desks, standing desks, Legal department desks. |
| Meeting rooms | Conference rooms, IT department rooms, Co-working rooms. |
| Parking lots | Management parking lots, Electric vehicle parking lots, Bicycle parking lots. |
Using space groups, you can implement the following scenarios:
-
Booking "standing desks" is allowed only during a specific time interval, QR-code check-in required.
-
Booking "individual desks" is allowed for a full day, Simple check-in required.
-
Booking "accessible parking spots" is allowed only to specific users, at specific time intervals, check-in not required.
Example:
- Space Type: DESK
- Space Groups: IT Desks (only available for the IT department), Sales Desks (only available for the Sales department), Free Desks (available to everyone).
2. How to create Space TYPES
To create a space type, go to Settings → Space types → Add+

- In the "Details" tab, name the space type and define its settings.
- If you activate the "Is workspace" setting, all spaces of this type will act as single units, bookable by only one person. The best examples of this scenario are desks and parking lots.
- If the "Is workspace" setting is not activated, the spaces of this type will act as shared units, such as meeting rooms. You will be able to activate the "Enable invites" and "Has capacity" settings that will allow you to invite multiple people to the booked space.
- You can also select a "Space Type Icon" for your space type for additional designation and identification.
- From the "iCal" tab, you get to determine how the bookings (made for this type of space) will show up in your calendar:
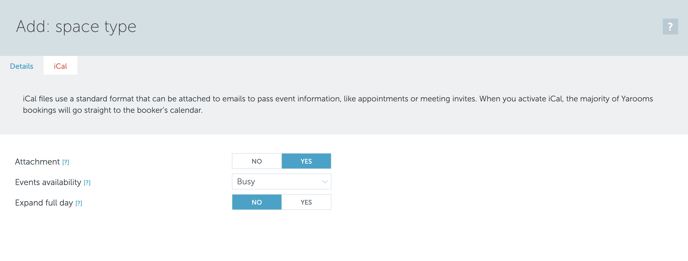
- Attachment: this is the option that can disable the iCal file from being sent as an attachment to the booking confirmation. So, for example, if you don't want your desk bookings populating your calendar, disable this option.
- Events availability: BUSY/FREE - if Attachment is set to YES, and the iCal file is being sent, this defines wether your calendar event will show as busy or free.
- Expand full day: activating this option will show the event in your calendar as a full-day event, regardless of the specific full-day interval from Yarooms. For example, in Yarooms, your full-day might be from 8am-6pm; having this option active means that your calendar will not show a 8am-6pm interval, but a full-day (header) event.
Once you defined the core settings of that space type, click on SAVE.
If you want to define Space Groups, Features, Reminders, and Event Types go back to Settings → Space Types and click on the newly created Space Type.
The spaces belonging to a specific Space Type can be organised into one or several Space Groups. You can find these in the "Groups" tab .
In the "Features" tab, add all features (Audio conference, flipchart, double screen, etc.) applicable to that space type. The name "features" refers mainly to their main use case, but feel free to consider them fully customisable labels that you can attach to your spaces.

In the "Reminders" tab, administrators have the option to configure multiple reminders for advance bookings. By specifying the days and hours in relation to the booking, reminders can be scheduled accordingly.


In the "Event Types" tab, users have the option to set up various event types that specify how the booked space will be utilized. Additionally, users can allocate a specific color to each event type for simplified identification.

These event types can be included in your bookings when reserving your space.

3. How to create Space GROUPS
After creating a new space type, you can add space groups to it. Each new space type has a default space group (created automatically) which you can edit. You can also create unlimited new space groups.
To create a new space group, go to Settings → Space types → Click on type (Desk/Rooms) → Groups → "Add group+".
Define the group:
1. Details
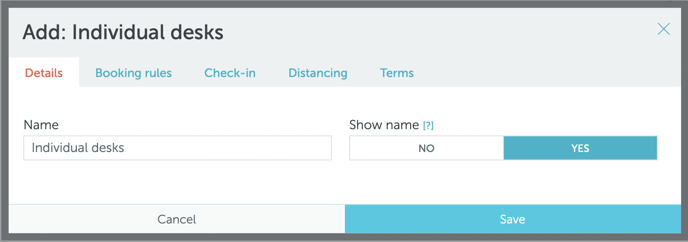
In the "Details" tab, you can name the group. If "Show name" is set to "Yes", the name of the spaces that are part of this group will be displayed on the map without clicking on it.
2. Booking rules
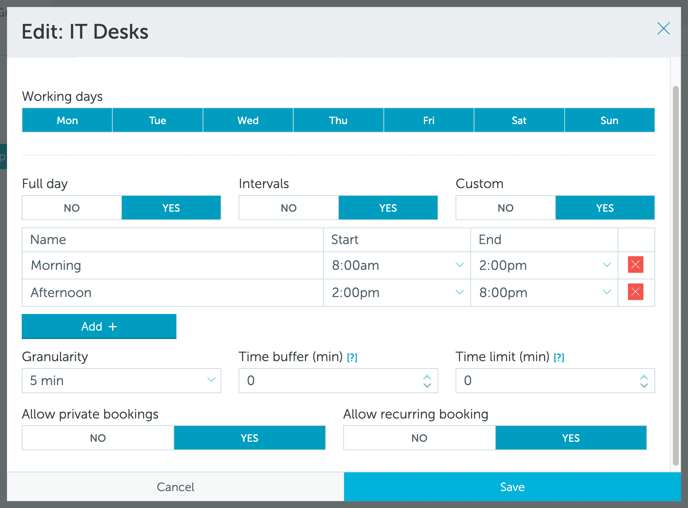
Here you can define how (and when) the spaces can be booked:
1) Working days - select the days on which spaces in the space group can be booked.
2) Booking rules:
- Full day - users can book spaces in the group for a full day (the exact daily schedule of the Location)
- Intervals - Administrators can create customised, fixed booking intervals, that will show as booking options when reserving a space. The intervals can have specific names (ex: Morning, Afternoon etc.), even though it's not mandatory.
- Custom - users can define their booking interval, within that day's working schedule.
At least one booking rule is required.
3) Granularity - applies only to Intervals and Custom booking rules. It refers to the time increments in which booking intervals can be defined.
4) Time buffer - can be used when Custom interval is active. Enter the number of minutes required between bookings to be used for cleaning, decongestion, etc.
5) Allow Private bookings - if activated, users will be able to reserve these spaces privately (their details won't be visible to other users).
6) If needed, you can deactivate recurring bookings using the "Allow recurring booking" option. Keep in mind that this only disables the users ability to set a recurrence pattern ("Repeat" switch seen during the booking process). Manually selecting several dates is still possible.
3. Check-in
If you are looking for information about how to configure check-in settings, read this article.
Enable the check-in functionality by activating the "Require check-in" option. Then, select the check-in strategy:
- Simple (users will be required to check-in from the browser, Teams or Mobile).
- QR-code (users will be required to scan the booked space's QR code from the YAROOMS Mobile app).
-
Geo-fenced (users will not be allowed to check in if they are outside the office's set radius in meters).
Set the grace period - the timeframe during which users are allowed to perform the Check-in. If the booker fails to check-in during the grace period, the booking is automatically canceled and the space is released.
If no check-in was performed, a 9 AM space reservation with a 15-minute grace period will be canceled automatically at 9:15 AM.
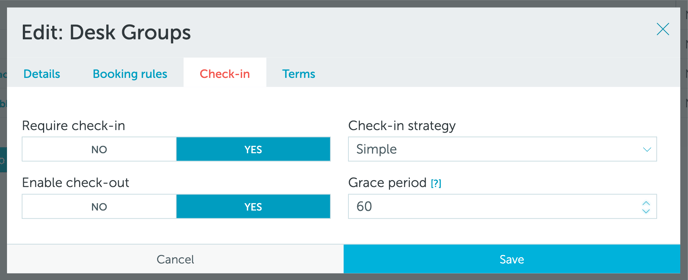
Enable/disable Check-out: the check-out option allows your users to end their bookings early, leaving the spaces available for others.
4. Distancing
The Distancing tab only shows up when you have the Physical Distancing option enabled for the Space Type the group belongs to.
Define the minimum distance between booked spaces. If you want to disable physical distance, set the "Min distance in m" to zero.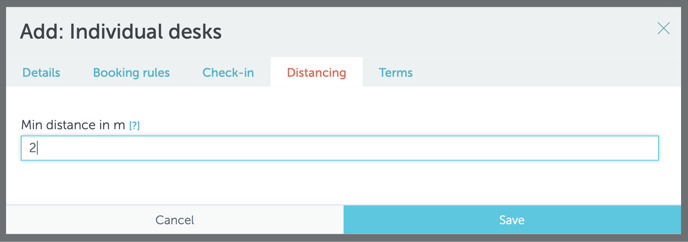
The distancing only works if you define the "Scale" field at Floor level (Settings → Workplace → click on the name of the floor → Edit → Image). The scale setting represents the number of pixels found in a meter, based on the floor's map photo.
5. Terms
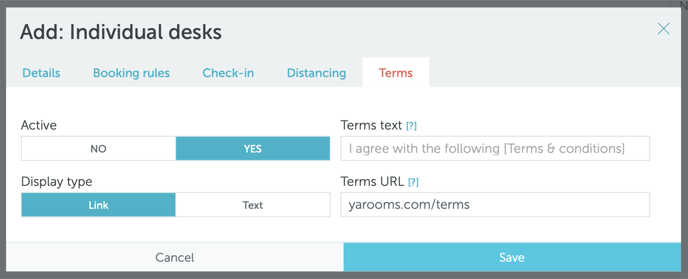
If booking spaces in the specific group requires agreement with terms and conditions, you can activate it from here.
The content of the T&C can be hosted:
- on an external webpage (include a link to it in the "Terms URL" field),
- directly in the Yarooms account UI (set Display type to "Text" and add the content).
The agreement text can be customized in the “Terms text” field. The text you place between the brackets (for example, in the photo below: [Terms & conditions]), will act as the link to the content of the T&C.
