This article explains how to create locations and floors of your physical space.
Jump to:
1. How to create a new location
Administrators have the ability to organise the office into locations and floors. Each Location has one or several Floors.
Locations are used to describe the physical aspect of the organisation. For example, if your company has 4 offices around the world, you would have 4 different locations, each with its own timezone.
1. How to create a new location

Simply go to Settings → Workplace, and click on the "Add location +" button.
➤ General
Define the location's name and the time-zone in which the location is. Specify its capacity and managers (not mandatory).
The time-zones are abbreviations, typically paired with a couple of large cities to provide you with a general idea about this location.
➤ Schedule
In this tab, you can specify the location's schedule (work hours). Read more about it here.
➤ Visibility
Use this tab to define the location's visibility settings:
Booker - if set to "Hide name", the booker's name will be hidden from the map for standard users. If set to "Hide name and assigned seat booking status", the assigned seats will appear as disabled even if when booked, to avoid the inference of the booker based on assignment.
Spaces - show all or hide non-bookable space groups.
Space groups - show on or hide from the timeline.
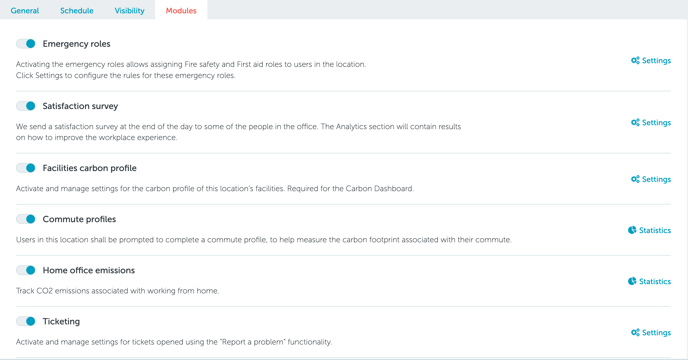
➤ Modules
Activate a series of modules for your location:
- Emergency roles: Activating the emergency roles allows assigning Fire safety and First aid roles to users in the location.
- Satisfaction survey: once active, at the end of the day a satisfaction survey is being sent to some of the people in the office. The results will be available for monitoring in the Analytics section.
- Sustainability Modules (Facilities carbon profile, Commute profiles and Home office emissions).
- Ticketing: allows admins to manage settings for tickets opened using the “Report a problem” functionality.

Don't forget to save your settings.
2. How to create a new floor
After creating a location, you can create its floors.
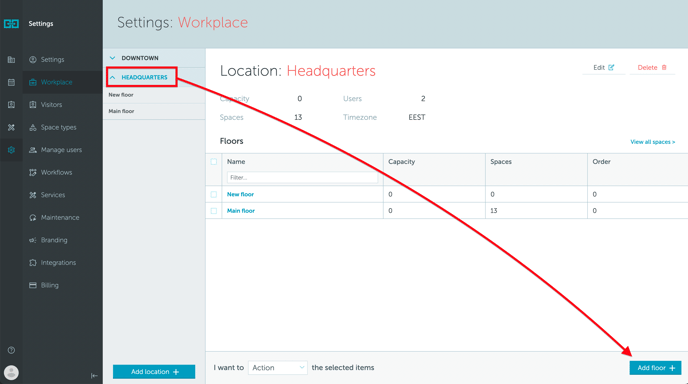
To create a new floor, go to Settings → Workplace, click on the location that you want to add the floor on, then click on the "Add floor+" button from that location's details page.
Name your floor, add capacity (not mandatory - only applies to total number of Desks), then move to the "Image" tab to add the floor plan and specify the Scale (pixel to meter ratio).
The uploaded image will act as a background on which you will proceed to place your spaces. If you ever plan to replace it, and the shape or dimension of the new floor plan is different from the old one, the spaces will appear as shifted. If that is the case, you will need to either upload the old map, or use the Map View Edit-Mode to reposition the spaces.
If you have multiple locations, make sure you click on the correct location before starting to create floor.